FortiGate – CLI commands to identify who is consuming your bandwidth

Hi all

I was searching for a quick solution to identify what’s happen on the firewall if users reporting very poor performance or a ping response for common websites grows up to hundrets of miliseconds.

Perhaps it’s a DDOS, Clients/Users doing wrong things or it’s just a missconfigured update service.

To identify what’s happen, you need to connect to CLI.

First you can clear the application statistics to identify what actually consuming your bandwidth.

diagnose stats app-stat-clear

Now you need to find out which application is the one who consumes your bandwidth – wait a minute to gather statistics

diagnose stats app-bandwidth

app=”SSL” appid=15895 total-sessions=59 bps=404657 bytes=404657
app=”Twitter” appid=16001 total-sessions=2 bps=137956 bytes=137956
app=”HTTP.BROWSER” appid=15893 total-sessions=50 bps=45220 bytes=45220
app=”iCloud” appid=29880 total-sessions=2 bps=21911 bytes=21911
app=”HTTP.BROWSER_Firefox” appid=34050 total-sessions=2 bps=4737 bytes=4737

This command shows a list of current application crossing your firewall. The first one is probably the interessting one. For further analysis you need the following command:

diagnose stats app-usage-ip <applicationID or Name>

diagnose stats app-usage-ip HTTP.BROWSER

app=”HTTP.BROWSER” total-usage=45220 total-sessions=50

ip=”192.168.1.1″ total-sessions=16 bytes=14128
ip=”192.168.1.2″ total-sessions=15 bytes=13417
ip=”192.168.1.3″ total-sessions=12 bytes=10776
ip=”192.168.1.4″ total-sessions=6 bytes=5298
ip=”192.168.1.5″ total-sessions=1 bytes=1601

You find now a list of source addresses using this application. Now you have identified the source of the bandwidth consumer.

If you want to know more details about the session, you can filter the session list diagnose using the source ip.

diagnose sys session filter clear

diagnose sys session filter src <src ip>

diagnose sys session filter src 192.168.1.1

diagnose sys session list

You get now a list of all sessions from this source ip.

For me it’s a good way to quickly find which applications crossing the firewall and consuming your bandwidth.
FortiGate – IPS for #regin C&C IP

Hi

For those who don’t have a FortiAnalyzer to track abuse traffic to known #regin C&C servers here is a custom IPS signature for your FortiGate Firewall.
Please only use “detect” for this custom IPS and please test before use in production!

F-SBID(–attack_id 1003;  –name “Regin.C.C.IP.custom”; –protocol tcp; –dst_addr [61.67.114.73,202.71.144.113,203.199.89.80,194.183.237.145]; )

THX to @Kaspersky for detailed analysis

Have fun!

FortiAnalyzer – Event Handler for #regin

Hi

According to the big hype about #regin I build a FortiAnalyzer Event Handler to track sessions to known regin C&C servers (I know they will change….).

Here is a sample: (THX to @kaspersky for detailed analysis)

Name: Abuse – Regin CC

Log Type: Traffic Log

Event Category: Others

Log messages that match: All

Primary Filter: Status – Not Equal To – Deny

Generic Text Filter:

(dstip==61.67.114.73
or dstip==202.71.144.113
or dstip==203.199.89.80
or dstip==194.183.237.145
)

Notification: Configure your prefered notifications

With this Event Handler you get an Event Alert if any communication is etablished to C&C Servers.

Have fun.

FortiAnalyzer – Advanced Traffic Events for abuse traffic

I was looking for a quick method to get alerted, if some bad IP addresses get accessed by clients.
This  should only be a monitoring and alerting solution, not a blocking/protecting one.

To realize this requirement I came across “Event Monitoring” on my FortiAnalyzer.

It’s very simple to add a quick monitor to get alerted if clients are accessing bad IP’s.

How it works:

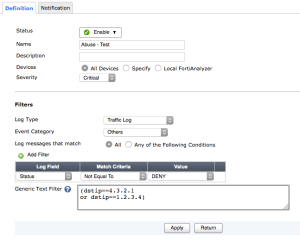
– Go to your FortiAnalyzer under “Event Management” you will find “Event handler”.

– Create a new handler for example: “Abuse – Test”

Bildschirmfoto 2014-11-03 um 21.11.58

You need to configure a filter – chose “Status Not Equal To DENY” and be sure that Log messages that match is set to “ALL”.

This setup generates an alert for all connections which are not blocked. To alert only the “bad ip’s” you should set a Generic Text Filter.

In our case:

(dstip==badip1 or dstip==badip2)

On the notification tab you can no configure syslog or email alerts for this specific event handler.

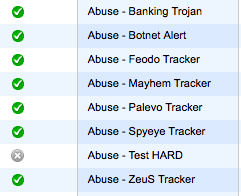
If you are lucky you can build your own Tracker for Bad IP lists.

For example you can use from http://www.abuse.ch Tracker. (Thanks to abuse.ch for your work!)

Abuse-Event2

After this you’re able to get a event if a client connects to a bad ip.

Have fun.

Generate netsh Script with powershell

Today we’ve to create up to 50 DHCP Scopes to implement the vLAN concept with 802.1x network authorization.

To do this job by hand isn’t easy, so I create a powershell script which creates a netsh script out of a .csv file.

##============================================================================================
##============================================================================================
## SCRIPT………: Create-Scope.ps1
## AUTHOR………: sirhartmann
## EMAIL……….:
## VERSION……..: 1
## DATE………..: 2013.02.04
##
## DESCRIPTION….: Creates a CMD file to create numerous DHCP scopes
##
## NOTES……….: Requires CSV file with these fields: “SCOPER”,”MASK”,”NAME”,DESC” “ROUTER”,”STARTIP1″,”ENDIP1″,”STARTIP2″,”ENDIP2″,”DNSSUFFIX”,”BROADCAST”
##============================================================================================

# IP address of DHCP server
$DHCPServer1 = “10.0.8.10”
$DHCPServer2 = “10.0.8.11”

#IP address of DNS servers
$DNS1 = “10.0.8.1”
$DNS2 = “10.0.8.2”

# Name of output batch file
$outputfile1 = “D:\DHCPscopes.cmd”

# Read data from csv file D:\Input.csv

$scopes = Import-Csv ‘D:\input.csv’
foreach ($scope in $scopes) {
### DHCP Server 1
“netsh dhcp server $DHCPServer1 add scope ” + $scope.scoper + ” ” + $scope.mask + ” ” + $scope.name + ” ” + $scope.desc >> $outputfile1
“netsh dhcp server $dhcpserver1 scope ” + $scope.scoper  + ” ” +  “set optionvalue 3 IPADDRESS”  + ” ” +  $scope.router >> $outputfile1
“netsh dhcp server $dhcpserver1 scope ” + $scope.scoper + ” ” +  “set optionvalue 6 IPADDRESS” + ” ” + $DNS1 + ” ” + $DNS2 >> $outputfile1
“netsh dhcp server $dhcpserver1 scope ” + $scope.scoper + ” ” + “set optionvalue 15 STRING” + ” ” + $scope.dnssuffix >> $outputfile1
“netsh dhcp server $dhcpserver1 scope ” + $scope.scoper  + ” ” + “add iprange” + ” ” +  $scope.startip1 + ” ” + $scope.endip1 >> $outputfile1
“netsh dhcp server $dhcpserver1 scope ” + $scope.scoper + ” ” + “set optionvalue 28 IPADDRESS” + ” ” + $scope.broadcast >> $outputfile1
“netsh dhcp server $dhcpserver1 scope ” + $scope.scoper + ” ” + “set optionvalue 51 DWORD 28800”  >> $outputfile1
“netsh dhcp server $DHCPserver1 scope ” + $scope.scoper + ” ” + “set state 0″ >> $outputfile1
” ” >> $outputfile1
}

foreach ($scope in $scopes) {
### DHCP Server 2
“netsh dhcp server $DHCPServer2 add scope ” + $scope.scoper + ” ” + $scope.mask + ” ” + $scope.name + ” ” + $scope.desc >> $outputfile1
“netsh dhcp server $dhcpserver2 scope ” + $scope.scoper  + ” ” +  “set optionvalue 3 IPADDRESS”  + ” ” +  $scope.router >> $outputfile1
“netsh dhcp server $dhcpserver2 scope ” + $scope.scoper + ” ” +  “set optionvalue 6 IPADDRESS” + ” ” + $DNS1 + ” ” + $DNS2 >> $outputfile1
“netsh dhcp server $dhcpserver2 scope ” + $scope.scoper + ” ” + “set optionvalue 15 STRING” + ” ” + $scope.dnssuffix >> $outputfile1
“netsh dhcp server $dhcpserver2 scope ” + $scope.scoper  + ” ” + “add iprange” + ” ” +  $scope.startip2 + ” ” + $scope.endip2 >> $outputfile1
“netsh dhcp server $dhcpserver2 scope ” + $scope.scoper + ” ” + “set optionvalue 28 IPADDRESS” + ” ” + $scope.broadcast >> $outputfile1
“netsh dhcp server $dhcpserver2 scope ” + $scope.scoper + ” ” + “set optionvalue 51 DWORD 28800”  >> $outputfile1
“netsh dhcp server $DHCPserver2 scope ” + $scope.scoper + ” ” + “set state 0″ >> $outputfile1
” ” >> $outputfile1
}

# End of Script

################

CSV File:

“SCOPER”,”MASK”,”NAME”,”DESC”,”ROUTER”,”STARTIP1″,”ENDIP1″,”STARTIP2″,”ENDIP2″,”DNSSUFFIX”,”BROADCAST”
“10.0.8.0”,”255.255.255.0″,”vLAN1″,”ScopevLAN1″,”10.0.8.1″,”10.0.8.50″,”10.0.8.149″,”10.0.8.150″,”10.0.8.249″,”iteh.local”,”10.0.8.255″

ebanking Trojaner in der Schweiz

Hallo zusammen
In den letzen Tagen wurden vermehrt Emails versendet, welche dich auf eine falsche Bank leiten.
Auch wurden Mails versendet, mit einer “Quittung” im Anhang, diese soll man dann mit einem doppelklick öffnen –> Mail löschen
Es handelt sich dabei um einen Trojaner. Gemäss den Medien sind davon 12 CH Banken betroffen.
Bitte achte darauf, dass dir deine Bank niemals Mails senden wird, wo du deine Daten eingeben musst. —> Mail löschen
Achte auch darauf, dass du keine Mails öffnest, welche du nicht erwartest oder du den Absender nicht kennst. —> Mail löschen
Hier findest du weitere Informationen:
Technische Informationen:
Bei Fragen oder Unsicherheit stehe ich dir gerne zur Verfügung.

Firewall: Part3 – Create a few rules to access the internet

Hi all

As in Part 2 you have created the first three rules to allow only trusted DNS Servers an block all other connections at the end.

Now it’s time to create some policies/rules to access the internet or your mails.

Internet access:

For your internet access you should create a policy like the following:

source: all internal
dest: all external
service: http, https
action: allow

To secure this connections you should enable websecurity, antivirus and intrusion protection on this policy. The settings varies from firewall to firewall. To be safe – enable NGFW features.

After this policy you should be able to connect to the internet.

Now it’s time to setup your mail service policies:
Before you can create a policy you should think about, what services you need.
– smtp
– pop3
– imap

If you know the service you need, then you can create your email firewall policy:

source: all internal
dest: your mail provider
service: smtp, pop3, imap (what ever you need – have a look at the FAQ of your email provider)
action: allow

To secure the connection – activate NGFW features on this policy too.

At the end of this part 3 you should be able to connect to the internet and receive/send emails.

Firewall: Part2 – Create your first important policies/rules

Hi all

First of all, I think you should create a few policies that are very important in every firewall implementation.

At the end of your ruleset you must create a DENY ALL “Last Rule”.
This rule is available on most firewalls by default – but should never be disabled from novice….

To secure your internal clients from compromised DNS Servers or DNS forwarders, you should implement a Rule for your two or three trusted DNS Server.
This rule looks like this:

source: all internal
destination: trust_dns_1, trust_dns_2
service: DNS
action: Allow

Following to this rule you must setup a block rule for all other DNS Servers like this:

source: all internal
destination: all external
service: DNS
action: Block

Now your clients can only connect to trusted DNS Servers. This means, that it’s not possible to compromise a DNS Server to redirect your clients to a malicious IP.

In the next Part we will discuss about the rules you need to access the internet or receive email and so on.

Firewall: Part1 – Build your own sophos utm box

Hi

In this posts I will show you how to build your own sophos utm box.

Hardware:

1x Shuttle Slim PC Barebone XH61V, LGA 1155, Intel H61, USB 3.0
1x Intel Core i5 2500K BOX, 3.3GHz, LGA 1155, 4C/4T, unlocked1x Corsair 2x 8GB SO-DIMM, DDR3-1333, CL9, Apple qualified1x Corsair Force LS 60GB, SATA-3, 2.5 Zoll

Software:
Sophos UTM 9.1 Home Edition

stay tuned, Part 2 will show you the initial configuration.